Learn how Visme will change the way you create stunning content.
Reserve your seatUsing Visme, users are allowed to easily import external data from Google Sheets into eye-catching tables. Here’s how:
1
Once in the editor window of your project, click on the “Data” tab located in the sidebar on the left of the screen. Then, access the “Tables” menu.
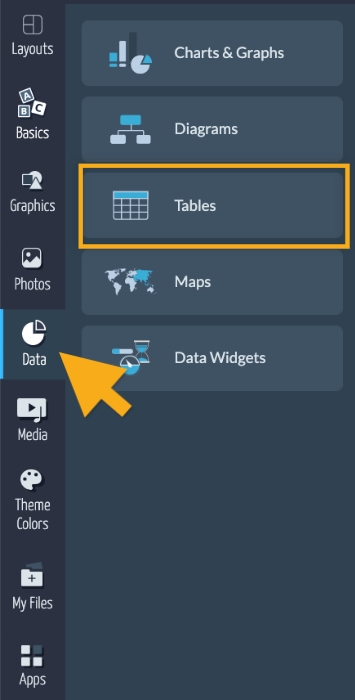
2
Choose the table you want to add by clicking on it and then select the columns and rows dimensions you need.
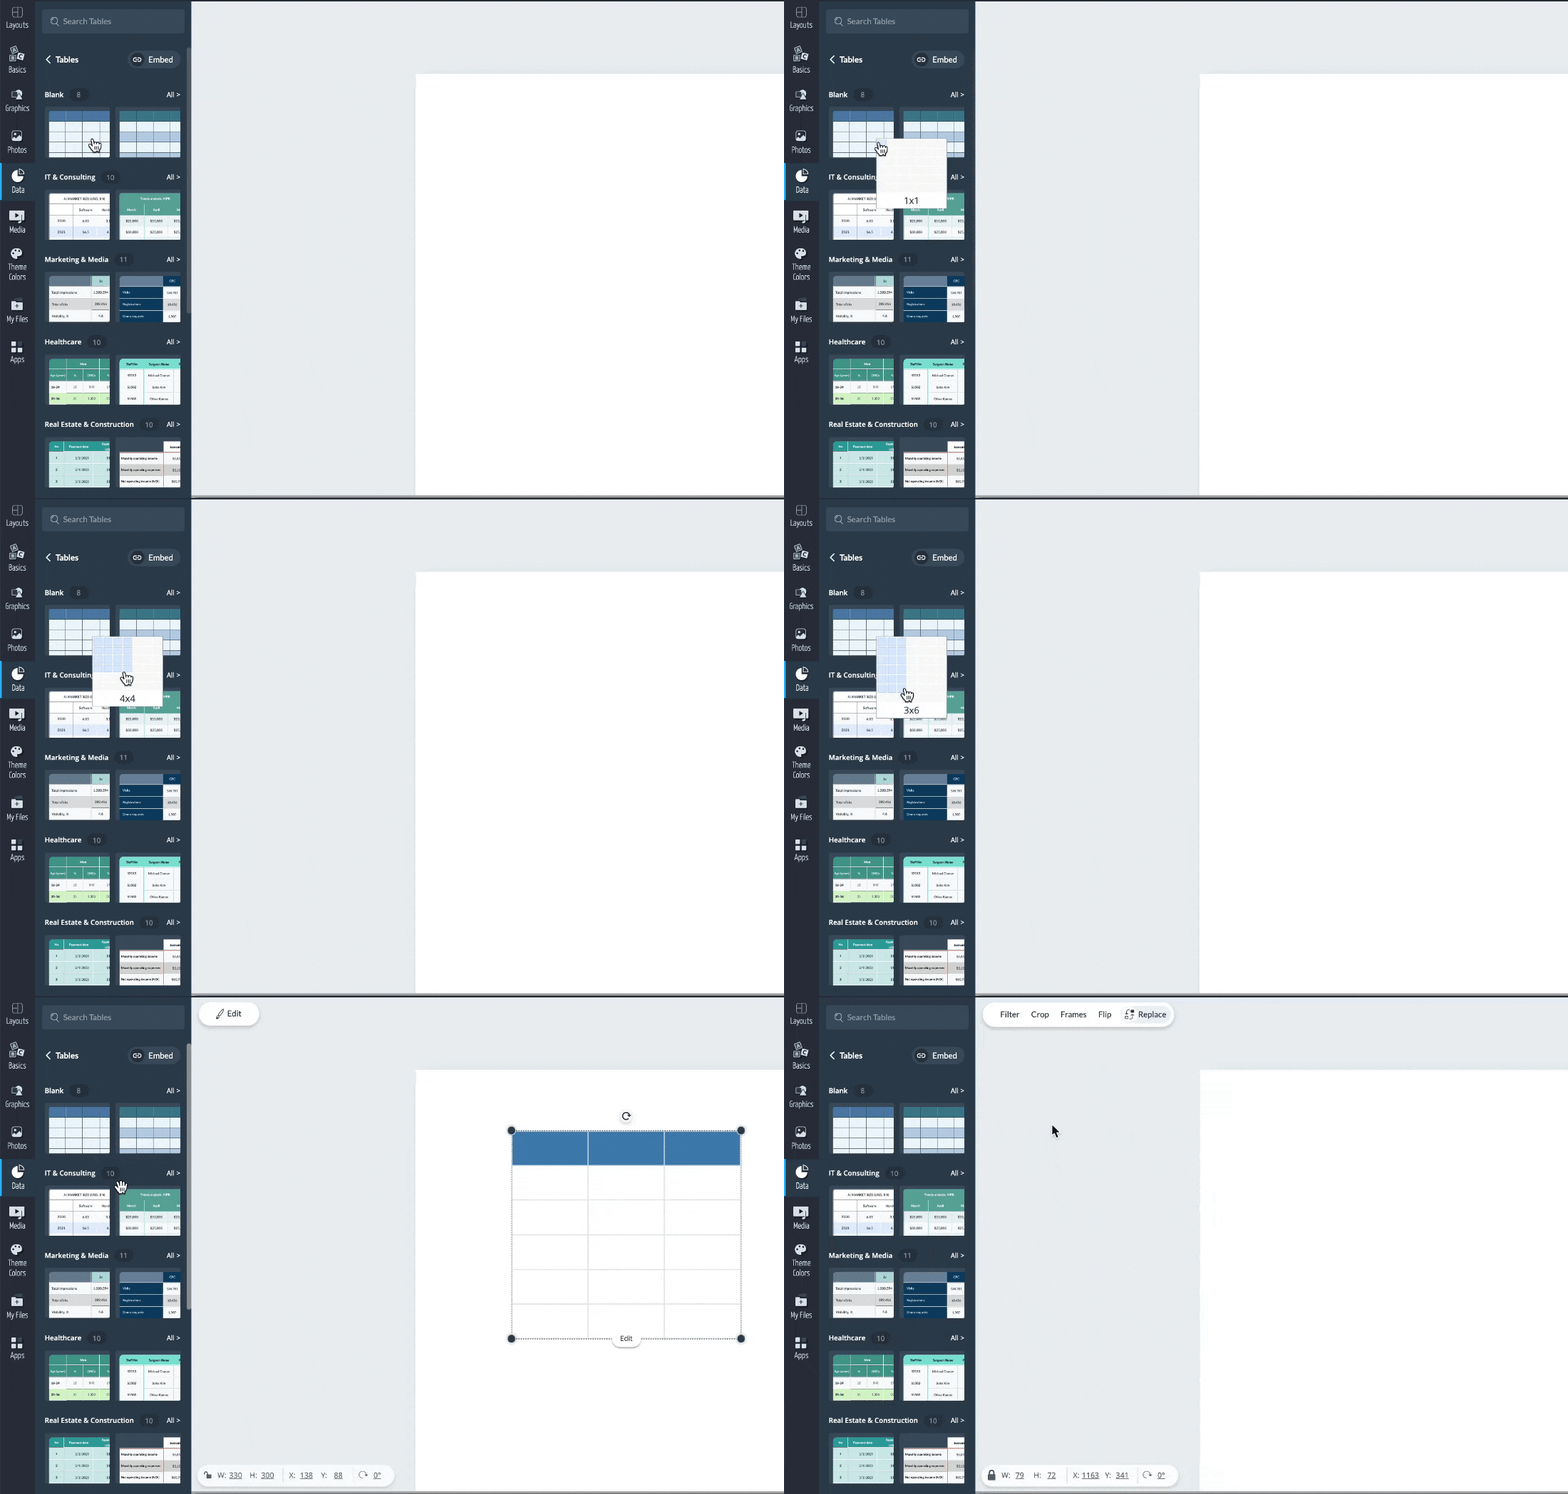
3
Select the table added into the project and navigate to the “Settings” Tab at the top left corner.
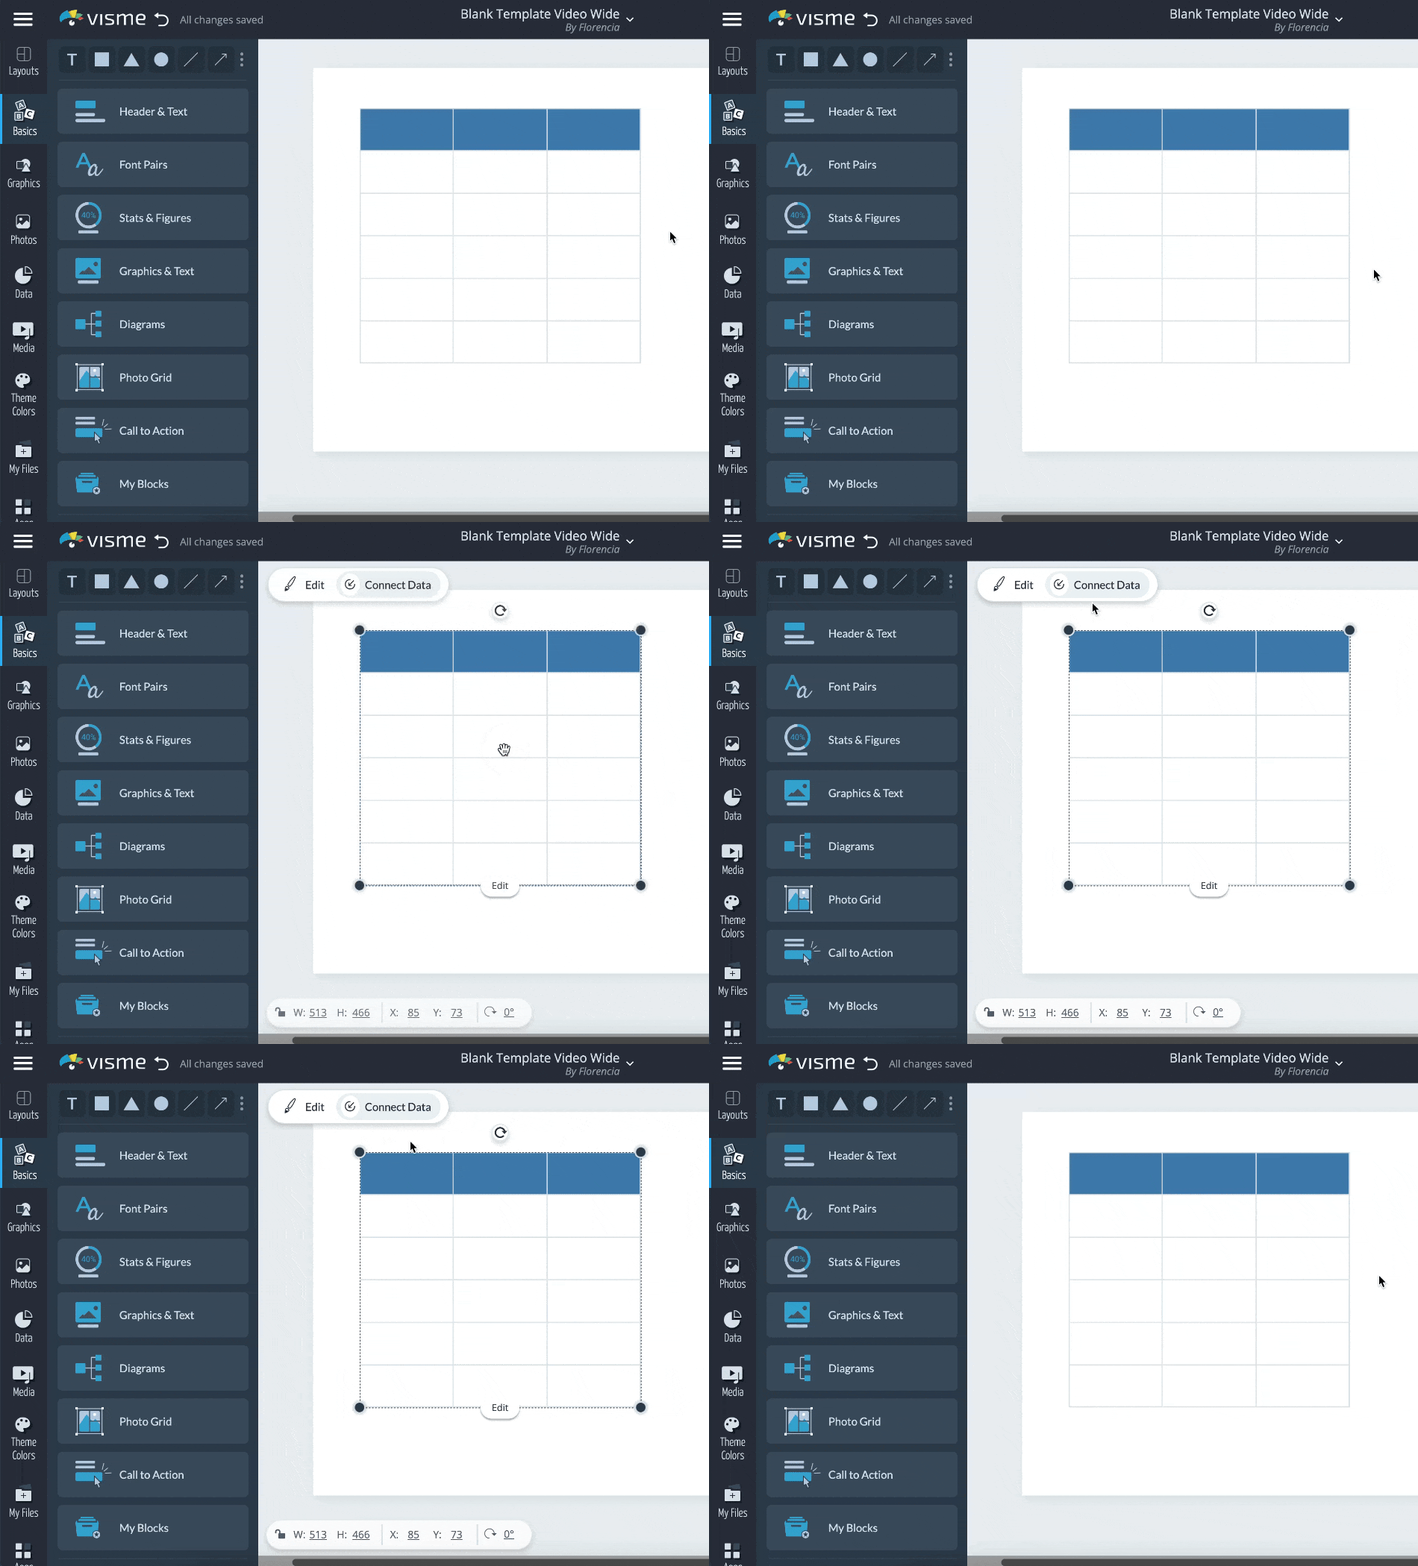
4
Navigate through the “Connect Data” button and click on the “Google Sheets” tab.
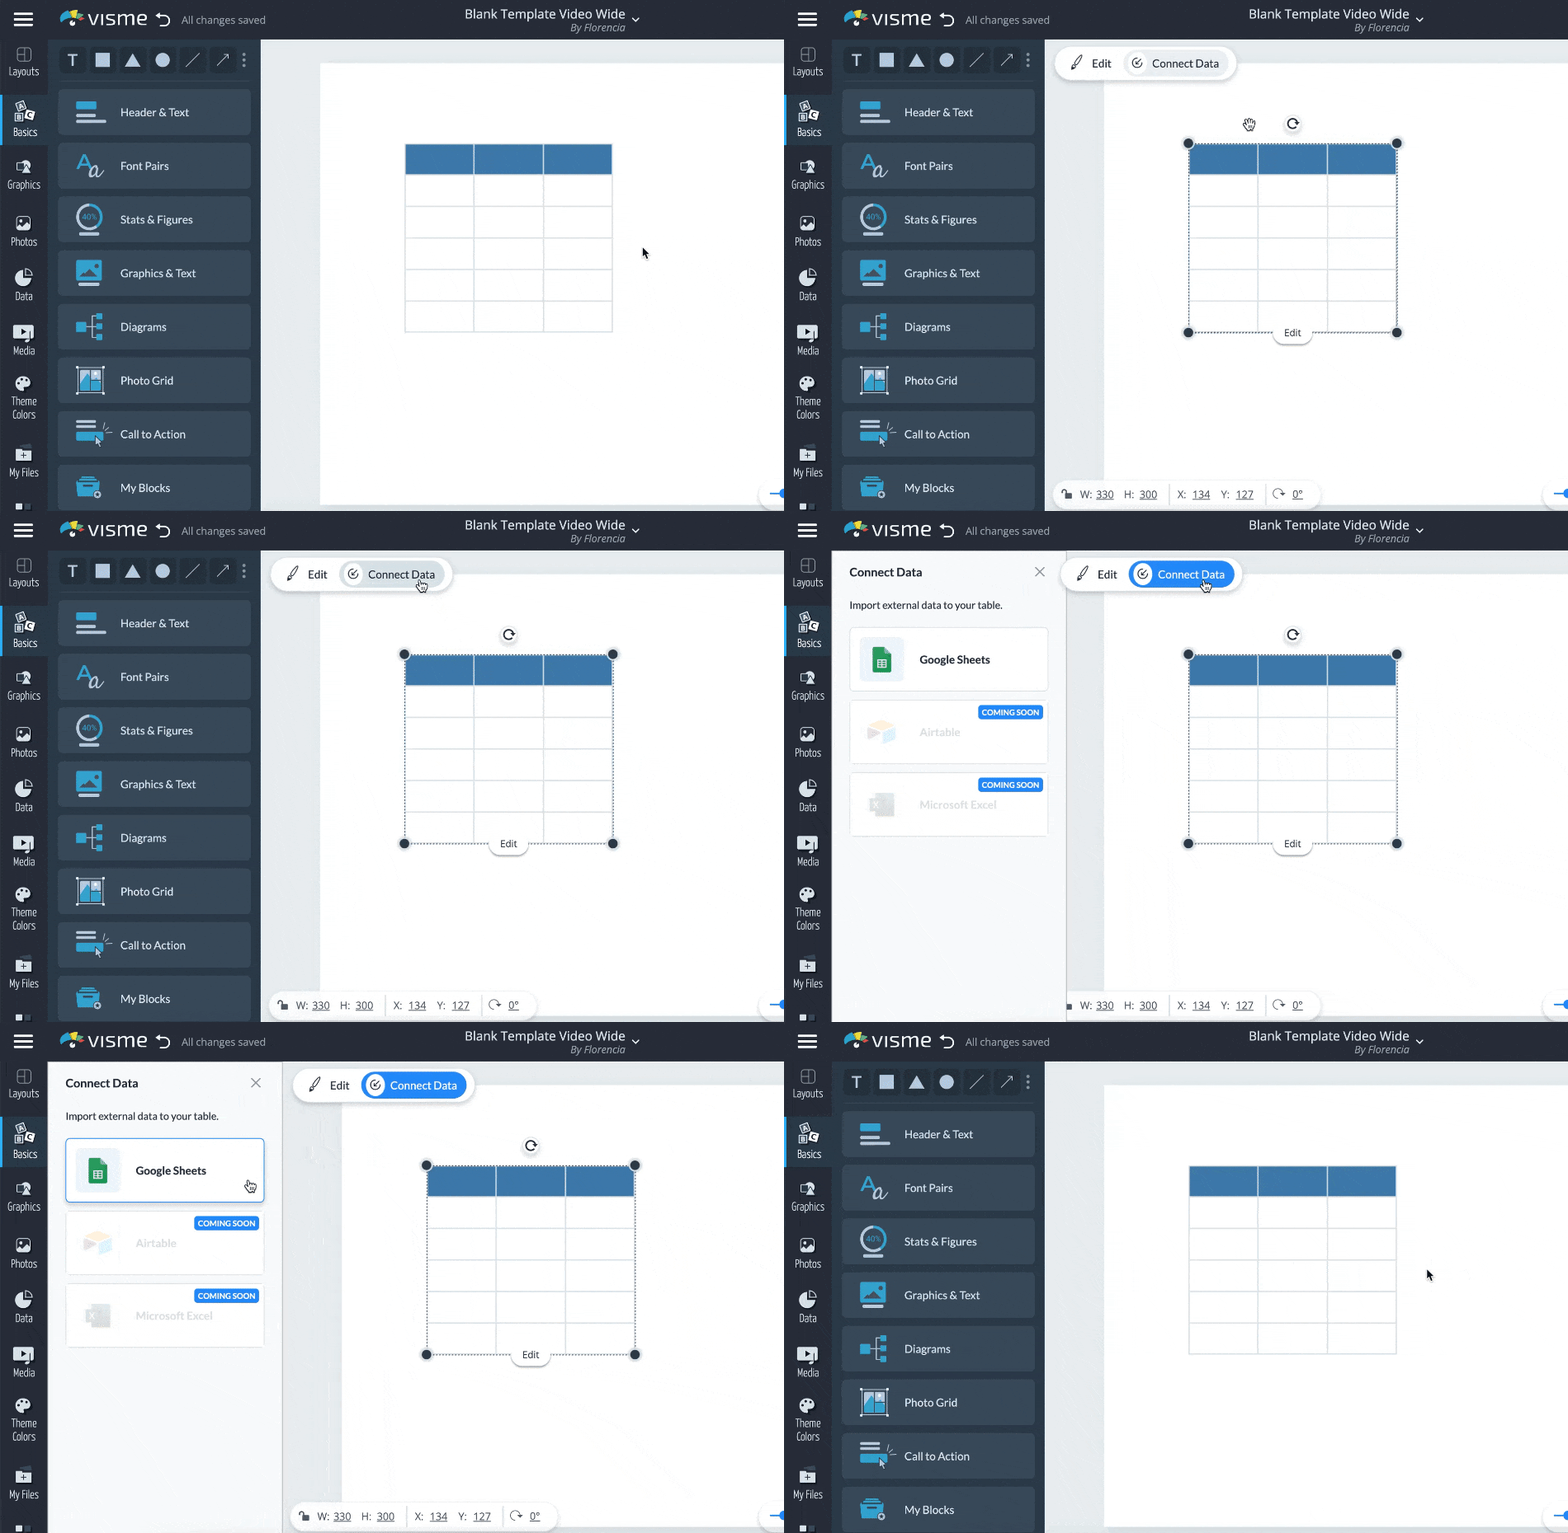
5
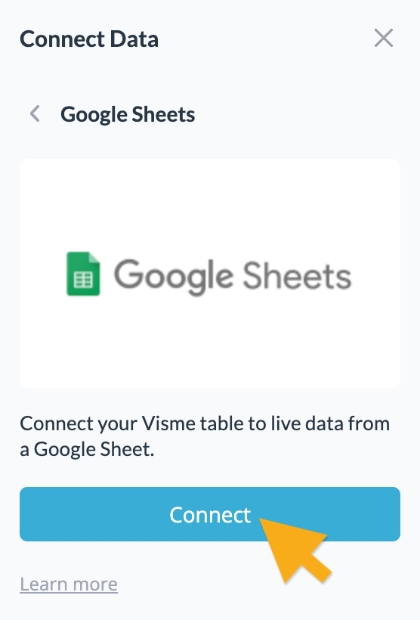
Click on the “Connect” button to connect your Visme table to live data. You will be redirected to the Google Authentication Page
6
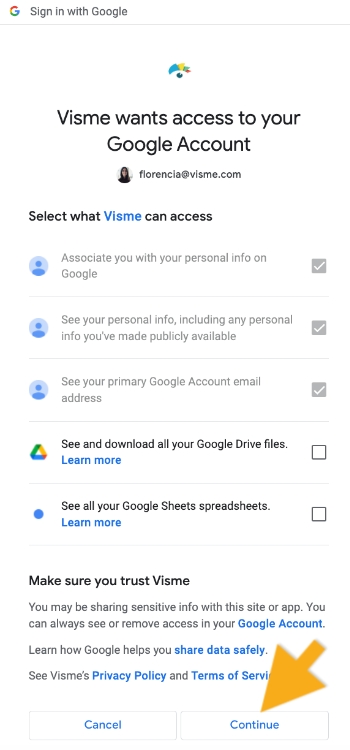
Select the Google Account you want to link and click on the “Continue” button to move forward.
7
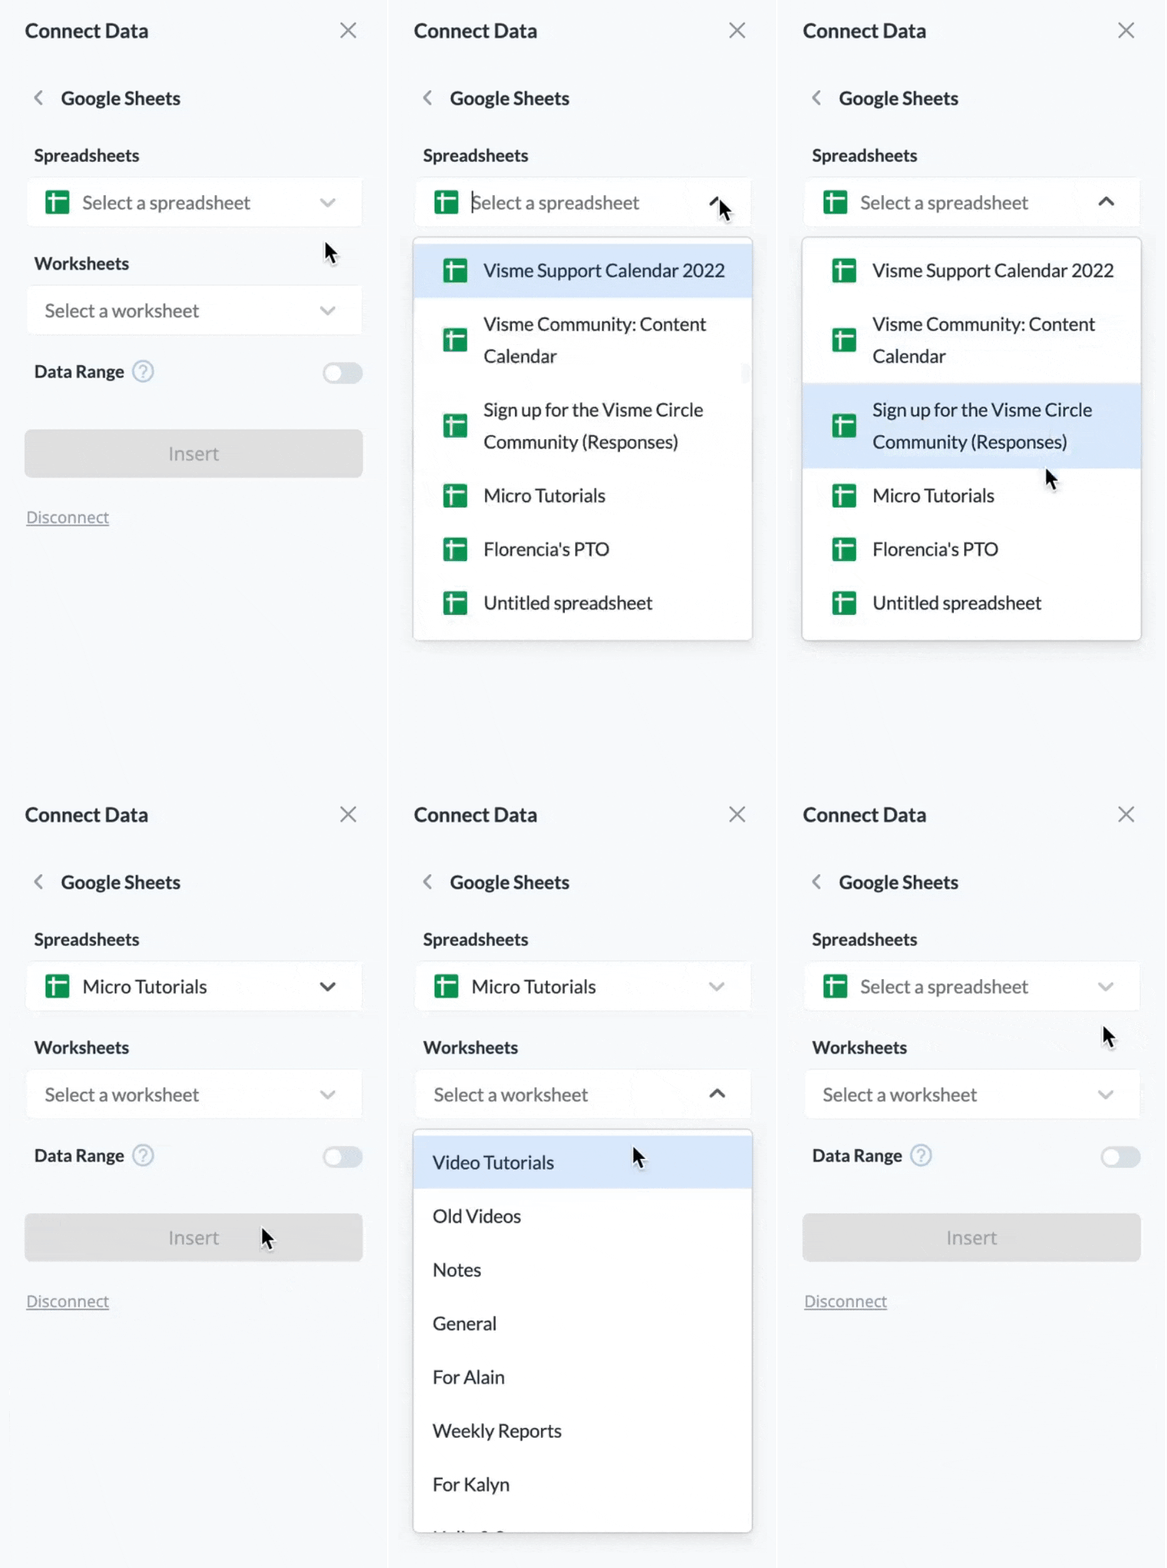
From the dropdown menus, select the Spreadsheet and the Worksheet from where you want to import the data and click on the “Connect” button
8
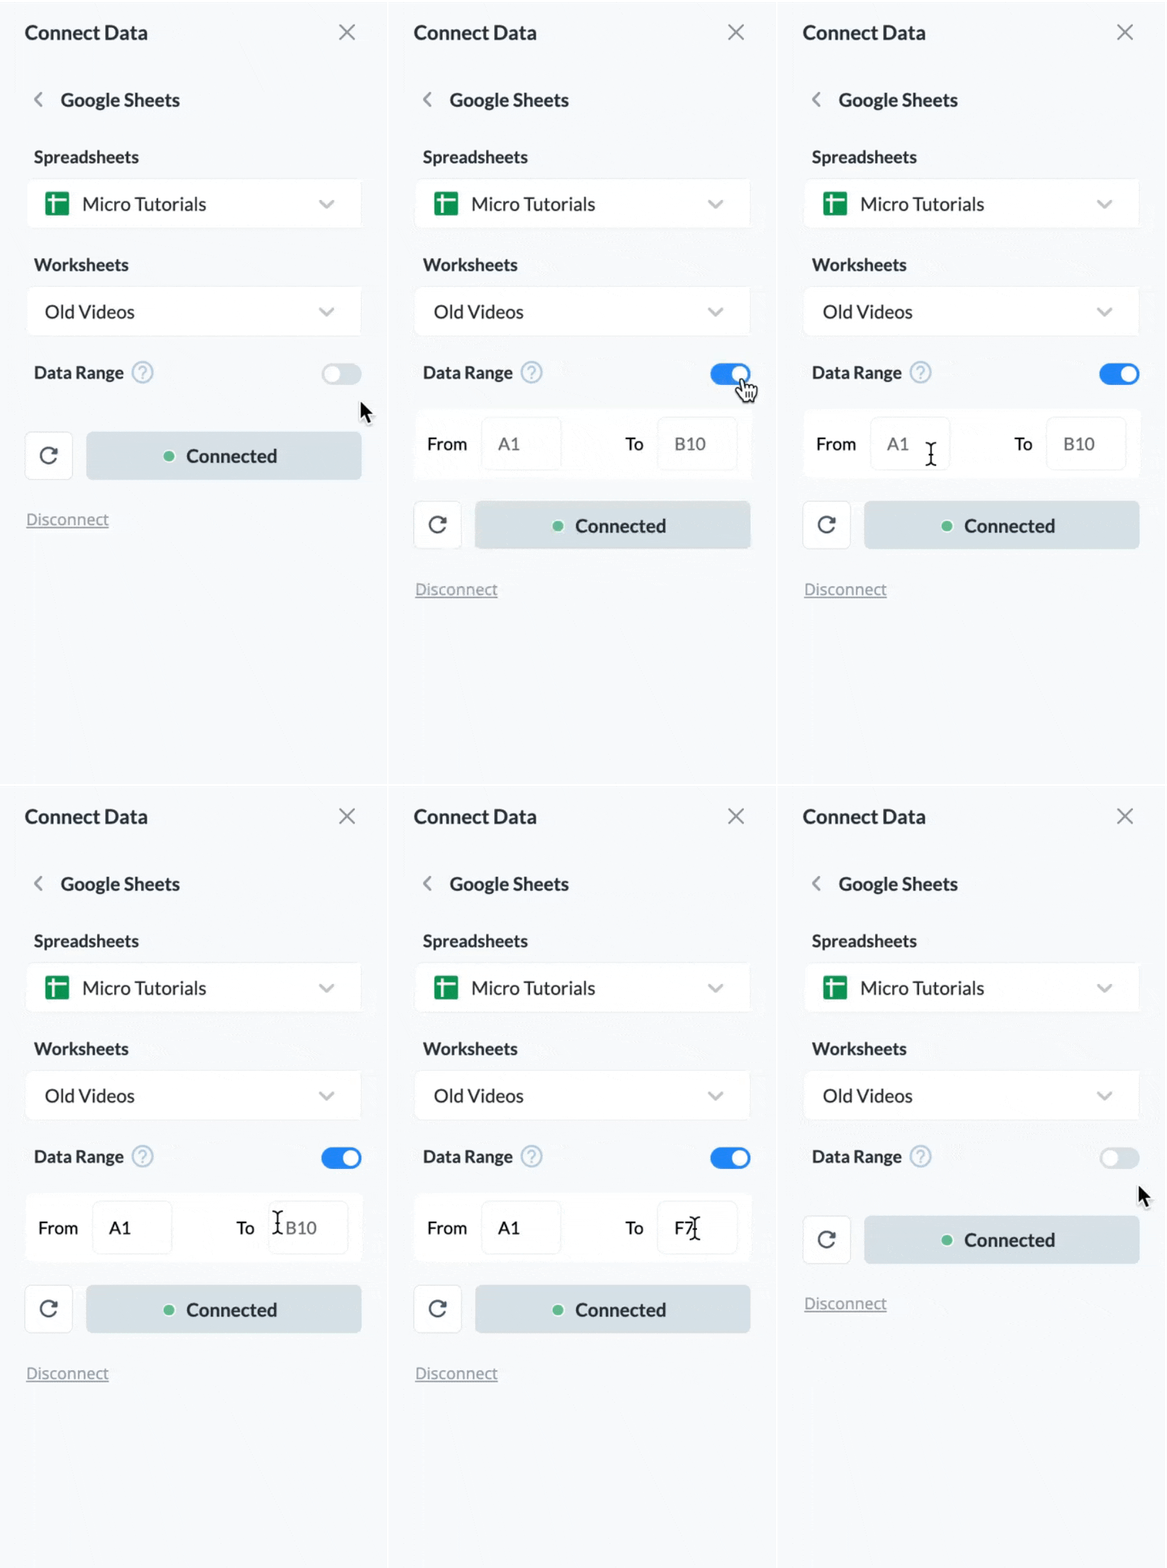
Turn the “Data Range” switch ON if you want to import a specfic range of columns and cells to the table. Then, define the range you want to be imported by filling in the boxes below.
Note: You can also embed existing tables right inside your presentations, documents, and more in a few clicks.
Home
Tables
- The Basics
- Enterprise Plans
- Link Expiration
- Elevate Your Brand with a Custom Subdomain on Visme
- Setting up Your Single Sign-On with Visme
- Secure Your Visme Account: Activate 2-Factor Authentication
- Premium Support for Enterprise Plan Users at Visme
- Enterprise Plans: Allowed Sizes, Limits, and Formats
- Getting Started
- Visme Community
- Visme Plans
- 5 reasons why you should use Visme
- Visme Mac Desktop App
- Visme Windows Desktop App
- What can I create with Visme?
- Who uses Visme?
- Publish & Present
- Shorten URL
- Find & Copy a Visme Project Link
- Allow Viewers To Download Published Projects
- How to present your content
- Share your Visme project privately
- Managing advanced settings for Visme projects
- How to present offline to an audience
- Sharing & Publishing my Visme
- Account & Plans
- How to update your Profile Information
- The Visme Community
- Cancelling your Premium Subscription
- Visme Languages
- Visme Storage Limits
- How to reset your Visme account password
- Manage Subscription Settings
- Where can I view my Payment History and Receipts?
- Update your Payment Information
- How to delete my account?
- Embed & Download
- Download your project as a PDF
- How to embed a website in a Visme project
- LMS Export for your Training content
- Downloading as HTML5
- How to download your project as GIF
- How to download your project in editable PPTX format
- How to download your project as Video
- Download infographics as multiple pages
- Downloading Projects for Offline Use
- Embedded Projects On A Website
- Creating & Editing 101
- Adding graphics to your projects
- Allowed Sizes, Limits and Formats
- Resizing the Canvas Size
- How to duplicate a Project
- How to use Basic Content?
- Importing PowerPoint Projects into Visme
- Saving your Visme Projects
- How to create a New Project
- For Print
- Common Questions & Answers
- Whitelisting a blocked Domain in Visme
- Emojis appear differently after being downloaded or printed
- User Accounts and Access Recovery
- Mastering AI Communication: Tips for Effective Prompts
- How to gather a HAR file
- Why Troubleshooting is Necessary
- Accessibility and Visme
- How to contact the Support Team
- Can I get a refund for my Visme subscription?
- Troubleshooting in Visme
- Project Types
- Presentations
- How to Create a Webinar Presentation in Visme
- How to Create a Marketing Presentation in Visme
- How to Create a Training and Education Presentation in Visme
- How to Create a Results and Reporting Presentation in Visme
- How to create a Sales Proposal in Visme
- Create a Stunning Presentation in 5 Minutes
- How to Create a Pitch Deck Presentation in Visme
- Types of Content you can create using a Presentation format in Visme
- Creating Business Presentations using Visme
- How To Mix & Match Slides or Pages In Your Design
- Social Graphics
- Documents
- Creating Manuals in Visme
- Creating White Papers in Visme
- Creating Newspapers in Visme
- Creating Proposals in Visme
- Creating eBooks in Visme
- Creating Plans in Visme
- Creating Newsletters in Visme
- Creating Reports in Visme
- Creating Catalogs in Visme
- Creating Workbooks in Visme
- Infographics
- Charts & Graphs
- Charts & Graphs Settings
- Dual Charts
- How to embed Tableau Graphs and Charts into Visme
- How to make a flowchart
- Importing Data Into Charts & Graphs
- Charts and Graphs
- Whiteboards
- Videos / GIFs
- Printables
- Custom Size
- Designing & Editing
- Designing with AI
- Increase images size using the Upscaler feature
- Unblur Images with Visme
- Background Remover
- Erase & Replace objects from an image
- Resizing your projects using AI Resize
- Visme AI Designer
- Image Editing: Visme’s Touch-Up Tools
- Visme AI Writer
- AI Image Generator
- Brand Wizard
- Data Visualizations
- Using Visme’s 3D Data Widgets
- Visualizing Data using Data Widgets
- Charts & Graphs Settings
- Dual Charts
- How to embed Tableau Graphs and Charts into Visme
- How to make a flowchart
- Pictograph and Arrays
- Importing Data Into Charts & Graphs
- How to create an interactive map
- Charts and Graphs
- Text & Text blocks
- Applying a Text Mask Effect
- Quickly Change Text Format in Visme
- How to Edit Multiple Text boxes at once
- Checklist Maker
- How to Annotate your Text
- Text Effects
- Font Pairs
- How to add Page Numbers
- Create a button from text block
- How do I add superscript or subscript?
- Interactivity
- Create Interactive Content in Visme
- How to create a pop-up effect
- Link To Another Slide
- Link to a Visme Project, Website, Email or Social Media
- Interactivity 101
- Images
- Image Editing: Visme’s Touch-Up Tools
- How to instantly upload images with a URL
- Add photos taken with your computer camera
- Image Placeholders
- How to create Mockup Designs in Visme
- How to change the angle of your Images
- Photo Grids
- Using Photo Filters
- Framing photos
- Cropping or resizing photos
- Animations
- Text Animations
- Animation Timeline: Audio & Recording Settings
- Animation Timeline: Advanced Tab Overview
- Animation Timeline: Basic Tab and Preview Overview
- Custom Animations
- On Click Animations
- Animation tips – Do’s and Dont’s
- Animations 101 – Learn to animate
- Video
- Tables
- Connect a Visme table to live Data
- Prefilled Tables
- Embed Tables within your Visme Projects
- How To Merge Cells Within A Table
- Adding Content To Tables
- Formatting and Styling Tables
- Inserting Tables
- Audio and Music
- Add an audio recording to any object
- Using the Audio Library
- Adding background music
- Customizing audio settings
- Uploading and Inserting Audio
- Graphics, shapes and icons
- Drop Shadow Effect
- Snap to Objects
- How to use 3D Animated Graphics in Visme
- 3D Graphics
- Color Dropper Tool
- Using Animated Graphics
- Insert a Visme Graphic into an Email or Newsletter
- How to Change Object Colors
- Format Lines
- Adding and removing shapes and lines
- Backgrounds
- Adding Background Videos
- Adding a Background Image
- How to remove the background of your images
- Using Gradient and Pattern Backgrounds
- Customizing backgrounds
- Tips for using background images
- 3D Animated Characters
- Collaboration and Team Features
- Workflows
- Manage Tasks with Visme’s Content Calendar
- How to approve a project
- Assign an approver to your project
- How to require a user to gain project approval
- Visme Workflow Overview
- How to assign an entire project to a team member
- My Brand
- Brand Area for Managing Multiple Clients: Tips & Tricks
- How to set up your Brand Area in Visme
- Brand Wizard
- Branded Templates
- Brand Settings
- Brand Styles
- Brand Links
- Brand Templates
- Brand Assets
- Create Custom Theme Colors
- Team & Workspaces
- Commenting on Visme Projects
- Getting comments and feedback on your Visme Project
- Commenting anonymously on Visme Projects
- Enabling Anonymous Comments on Your Visme Project
- How to update the Workspace Name
- Workspace Audit Log
- How to join a Visme Workspace
- How to add new users to your team
- Your team in Visme – How to collaborate together
- Managing your Workspace
- Apps and Integrations
- Visme Integrations: Visme + Monday.com
- Visme Integration: Visme + Vidyard
- Visme Integration: Visme + Wistia
- Visme Integration: Visme + YouTube
- Visme Integration: Visme + Vimeo
- Visme Integration: Visme + Livestorm
- Visme Integration: Visme + LearnWorlds
- Visme Integration: Visme + Brandfetch
- Visme Integration: Visme + Formstack
- Visme Integration: Visme + MailChimp
- Analytic Tools & Insights
- Analytics
- Registration Form Results
- Deeper Analytics
- Analytics – Tracking traffic & statistics of projects
- Registration Form
- Tips & Tricks
- Account & Projects Settings
- Slide Progression Control Feature
- Folder Sharing | FAQs
- How to duplicate project folders
- How to log out of your Visme account
- Hiding control bar on published projects
- Viewing and Presenting
- Creating and Designing
- Visme AI Designer
- Trim View
- Create faster with Shortcuts
- Using Find & Replace
- Creating Interactive eBooks
- Visme Ruler & Smart Guides
- Coordinates Panel
- Objects List
- Zoom In & Out
- Creating & Designing Emails In Visme
- Productivity Tools
- Tools & Features
- Visme AI Designer
- Visme AI Writer
- Drawing Tool
- AI Image Generator
- Interactive Xperience
- XLIFF Localization Feature
- Design on the go with Visme iOS App
- Workflow Management: Assign projects or slides to your team
- Spell Checker
- Prototype Your Designs with Visme
- My Files
- My Files: Using folders and labels
- My Files: Settings
- My Files: Overview & How to Access
- My Files: How to manage your assets
- Grides & Guides
- Slide Library & Content Blocks
- Forms & Surveys
- Getting Started with Visme Forms
- Types of Forms you can create using Visme Forms
- Getting Started with Visme Forms
- Visme Forms FAQs
- Visme Forms vs Traditional Forms
- Sharing and Embedding your Visme Form
- How to embed a Visme Form on Wix
- How to embed a Visme Form on WordPress
- Embedding Visme Forms
- Sharing and Publishing Visme Forms
- Sharing Visme Forms – Publishing and Embedding
- Maximizing Visme Forms
- Design your Form
- How to create a Multi-Step Form in Visme
- How to create Single-Page Forms
- How to Add a Country question to Your Visme Form
- How to Add a Time Question to Your Visme Form
- How to Add a Rating question to Your Visme Form
- How to Add an Appointment Question to Your Visme Form
- How to Add a Date Picker Question to Your Visme Form
- How to add Short and Long answers questions to your Visme Form
- How to Add a Phone Field to Your Visme Form
- How to add an Address field to your Visme Form
- Data Collection and Management
- What happens when a Form is submitted?
- Analyzing Visme Forms Performance
- How to collect and sync Data across different Applications
- Forms Integrations
- Forms Integrations: Visme + Zapier
- Forms Integrations: Visme + GetResponse
- Forms Integrations: Visme + Klaviyo
- Forms Integrations: Visme + ConvertKit
- Forms Integrations: Visme + Airtable
- Forms Integrations: Visme + Brevo
- Forms Integrations: Visme + ActiveCampaign
- Forms Integrations: Visme + Google Sheets
- Forms Integrations: Visme + HubSpot
- Forms Integrations: Visme + Mailchimp
